This vegan garlic mayo recipe is easy to make and creates a rich, creamy and garlic-packed dip or sandwich spread. Making homemade aioli is so simple, there’s no need to buy it (especially considering most are not vegan).
Overflowing with roasted garlic and other delicious flavors, it’s a crowd-pleasing, non-vegan approved recipe that’s free from dairy, eggs, gluten, grain, nuts and added sugar. While it takes some time to roast the garlic and allow it to cool, it’s well worth the wait!

This post contains affiliate links (including Amazon Associates) and I earn from qualifying purchases.
Is Garlic Mayo Vegan?
Most mayonnaise options (homemade or store-bought) contain egg meaning they are not vegan. Beyond that, non-vegan ingredients may be added to the aioli.
However, it’s incredibly easy to make your own vegan mayo or buy a vegan mayonnaise alternative. After that, adding delicious roasted garlic and a few other flavors quickly creates a decadent sauce that’s extremely versatile!
I interchange the terms garlic mayo and garlic aioli for this recipe. While mayo and aioli are technically different (some would argue they’re extremely different) aioli is like mayo in my opinion. Regardless of what you want to call it, this recipe tastes unbelievably amazing!
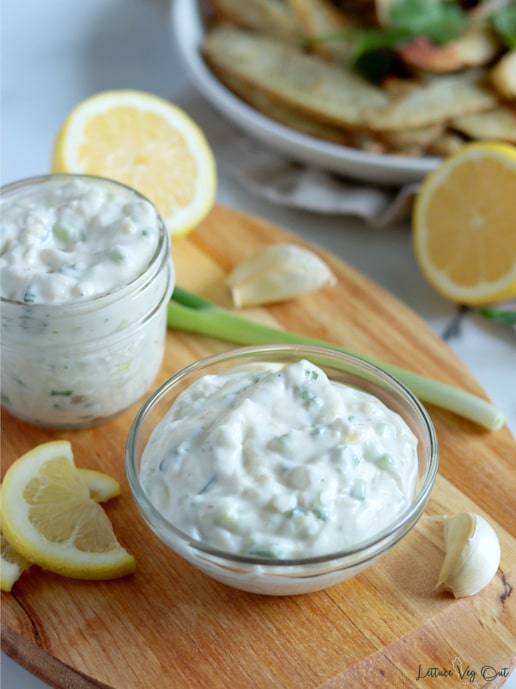
Ingredients to Make Vegan Garlic Mayonnaise
This recipe uses basic ingredients to create a savory and garlic-packed dip or spread, perfect for sandwiches, burgers or as a dip! All ingredients are easy to find at an average grocery store and are all staples in my vegan kitchen.
- Vegan mayonnaise: Whip together a quick batch of homemade vegan mayo or use a store-bought alternative as the base for this tasty recipe.
- Garlic: You’ll want lots of garlic to create a mouth-watering and irresistible garlic aioli. Much of the time needed for this recipe is to roast the garlic; this brings out the garlic’s mild and sweet flavors.
- Olive oil: To roast the garlic, use a small drizzle of olive oil. Any type of oil can work though, so use what you like!
- Salt and pepper: For roasting the garlic and to add extra flavor to the aioli, salt and pepper are essential!
- Green onion: Boost the flavor, add color and some crunch to this tasty dip with chopped green onion. Any type of finely chopped onion can work, as would 1 teaspoon onion powder for a smoother aioli.
- Lemon juice: Adding acidity and freshness with lemon juice truly boosts the flavor of this garlic mayo. Lime juice would also work great for a slight variation in flavor.

How to Make Vegan Garlic Aioli
This is a simple recipe that requires only a few steps. Just start with a store-bought or homemade vegan mayo!
Step 1: Roast Garlic
Roasted garlic is one of my favorite things to eat. It’s incredibly flavorful and tastes completely different from raw garlic. It’s golden brown, soft and spreadable, and has a mild flavor (none of that raw garlic “bite”).
To roast garlic, remove any excess papery outer layers from the garlic head, keeping the head and all the cloves intact.
Then, slice a thin layer from top to expose all the cloves.

Place your garlic onto a small piece of tin foil with the exposed cloves facing up. Drizzle with olive oil (about 1 tablespoon). I like to sprinkle on some salt and pepper too, but this is optional.
Wrap the head of garlic in tin foil then place on a baking tray; your tray will catch drips of oil if it leaks from the tin foil.
Place the garlic into an oven preheated at 400 °F for about 40 minutes. The aroma from the oven will be mouth-watering and irresistible but wait a full 40 minutes so the garlic comes out super soft, golden and delicious.
Chill the roasted garlic before making the mayo; you can place it in the fridge to speed the cooling process.
Step 2: Mix Aioli Ingredients
When the roasted garlic is cool enough to handle, remove half the cloves from your head of garlic (about 5 cloves but use as many as you like). Extra roasted garlic can be added to pretty much anything for a boost of flavor! You can even spread it directly onto crackers!

Add the remaining aioli ingredients to a small bowl (mayo, minced green onion, lemon juice and salt) along with roasted garlic. Stir everything together, mashing the garlic so everything is well mixed incorporated throughout the mayo.

Step 3: Chill and Serve
If all your ingredients were fully chilled when prepping the mayo, go ahead and serve right away. If the garlic wasn’t cold, place your mayo in the fridge until fully chilled.
Mayonnaise tastes best after refrigerating for about 30 minutes. This gives your garlic and other flavors time to infuse into the mayo!

How to Create a Balanced Vegan Meal
A balanced meal should ideally contain some protein, carbohydrates, fats and veggies or fruits. Since the base of this recipe is mayonnaise, it mainly provides fats to whatever meal you serve it with.
Garlic mayo is meant to be a dip or spread, adding flavor to your food. Add it to meals that already contain some plant-based protein, carbohydrates (whole grains or starchy vegetables) and veggies.

Roasted Garlic Aioli Serving Ideas
Garlic mayo is super versatile; you can add it to any meal that needs a boost of flavor!
Some tasty ways to serve garlic aioli are:
- With French fries, sweet potato fries or potato wedges
- As a dip for vegan crab cakes
- On a plant-based burger
- On sandwiches or wraps, in place of mayo
- A sauce or dip for roasted or grilled veggies
Let me know how you serve your garlic mayo in the comments below!

How to Store Leftover Garlic Mayo
Refrigerate leftover garlic mayo in an airtight container or jar for up to a week. I like to make this recipe in a jar so I don’t dirty extra dishes and can store it in the mixing container.

📖 Recipe

Vegan Garlic Mayo
Equipment
- Tin foil
- Small mixing bowl
Ingredients
Roasted Garlic
- 1 head garlic
- 1 tablespoon olive oil
- pinch of salt
- 1 pinch black pepper
Garlic Mayo
- ½ cup vegan mayonnaise
- 5 cloves garlic , roasted (about ½ head)
- 3 tablespoons green onion , finely chopped
- 1 tablespoon lemon juice
- ⅛ teaspoon salt
- 1 pinch black pepper (to taste)
Instructions
Step 1: Roast Garlic
- Preheat oven to 400 °F.
- Remove excess papery layers from the head of garlic, keeping the head and all the cloves intact.1 head garlic
- Take the head of garlic and slice a very thin amount off the top; the very tops of the garlic cloves should be visible.
- Place the garlic into a small piece of tin foil and drizzle olive oil over the top along with a sprinkle of salt (optional to add a pinch of black pepper too).1 tablespoon olive oil, pinch of salt, 1 pinch black pepper
- Wrap your tin foil around the garlic to seal and place onto a baking tray (to catch any dripping oil).
- Bake for about 30 minutes, until garlic cloves are fully soft to the center.
- Once cooked, remove from oven and allow to cool (place into fridge for quick cooling).
Step 2: Mix Aioli Ingredients
- Once the garlic is chilled enough to handle, remove half the cloves (about 5). You can do this using a fork or simply press from the bottom and roasted garlic cloves should pop out.5 cloves garlic
- In a small mixing bowl, stir together vegan mayo, roasted garlic, minced green onion, lemon juice and salt/ black pepper (more or less to taste).½ cup vegan mayonnaise, 3 tablespoons green onion, 1 tablespoon lemon juice, ⅛ teaspoon salt, 1 pinch black pepper
- Mash your garlic into the mayo – you can do this before adding if you like.
- Stir everything together until well combined.
Step 3: Chill and Serve
- If all the ingredients were cold when mixing the mayo together, you can serve right away. Otherwise, place into fridge to chill completely before serving.
Notes
Nutrition
More Vegan Condiment Recipes
Like this recipe? You should also try:

About Nicole Stevens
Nicole is a long-time vegan with a Masters of Science in Food and Nutrition.
She helps people thrive on a vegan diet with balanced recipes.

Janet O'Brien says
This mayo absolutely knocked me out!! Very easy to prepare. Even non vegan/non vegetarian friends loved it. So far I've used it to dip those little persian cukes, peeled and quartered in. Heavenly. Can't wait ro use it for other crudités', french fries, and so on, and so on! Thanks for this winner!
Nicole Stevens says
So happy you've been enjoying it! It's tasty with pretty much anything 🙂
Erin says
Yummy
Nicole Stevens says
Glad you enjoyed the recipe, Erin!
Doris says
I am going to make this recipe. Can I substitute lemon juice for the vinegar?
Nicole Stevens says
If you want to use vinegar, start with 1 teaspoon (instead of 1 tablespoon) and add extra as needed, up to 1 tablespoon (or until it tastes good to you!).